Social Media Icons

Friday, April 29, 2016

Hello Spring..what is growing in the garden

I love cloudy days. I can walk outside with no glaring sun, I love the cool breeze and the rolling fields in the neighborhood are a bliss to watch. From grass to trees, groudhogs to cayotes, everything is waking up from hibernation. April has been cold so far. A couple of days of warm weather followed by cool days and cold nights. In those few warm days, I managed to set some cool season vegetables outside. Everyone who gardens knows what a delight it is to watch your plants grow and trees bloom in spring, especially when effort has been put in setting them up in your garden.

I prepared plant beds early this month to set a few early season vegetables in the ground. I put compost in the beds, weeded them and also covered them with cardboard sheet mulch. So far, cabbage, lettuce, onions, garlic, cilantro, watercress and spinach have found their happy place in the lap of mother earth. Hopefully, they will do well.

A bit on sheet mulching. For my garden, I did it the simple way this year. I bought old cardboard in bulk from someone who was selling it for free on craigslist (drove 50 miles to get the cardboard). I removed any staples, pins and tape from the cardboard, opened them and laid them on my beds for the entire length of the beds. On top of the cardboard, I put a layer of leaf compost and some heavy sod to hold the cardboard in place. I didn't had too many stones on the property so sod was the only thing that I could use to press the cardboard.

I found that young the young seedlings did surprisingly well in the ground in harsh weather days of April.  At one eventful night when wind gusts of 40 mph blew my small hoophouse and a fix was done at 3:00 am, I woke up the next day to find all little transplants doing well in the ground. I couldn't exactly understand the reason but I was happy. There is something about being in contact with the earth that holds them together. The seedlings in trays or pots if subjected to strong winds and fluctuating temperature would have died. A few earlier sets of basil, watercress and cilantro indoors did die when accidentally left them hoophouse on a really cold night. Basil is a warm weather herb and I understand it can't tolerate cold after a few sets died. I need to make a mistake twice in order to learn a lesson from it.

I am sharing a few pictures of how my garden looks like at this time. On any given day, I prepare two beds and make them ready a week before transplanting my seedlings in ground. I punch holes in the cardboard and plant my transplants into them. There is obviously multiple ways of preparing beds, some more efficient than others. Cost though is a factor that I have to keep in mind during my first year. Let me know in comments below how do you take care of your early spring crops.

Happy Gardening.


Cilantro and watercress in one bed
Garlic shoot..just sprouting


Lettuce

The little cabbage

 
Spinach bed direct seeded. Lots of grass on the bed.

Onions

Tuesday, April 19, 2016

Materials used for starting a vegetable garden

Since I started gardening, I have spent quite a lot on material costs. My gardening endeavor started in late february this year when I sowed a lemon seed in pot. From the day, the first seed was sown in the pot up till now, the garage and house are stacked with things I purchased in last two months. What surprised me about myself was I ended up spending more that I thought even before the first seed ever sprouted. The materials that I purchased were necessary to get things started. I have been extra careful not to purchase things that I don't need for garden. At times, you make purchases as you go and some unforeseen costs. I wanted to share a list of materials that I have purchased so far and get your feedback on what I could have avoided as an unnecessary purchase. The size of my garden is around 10,000 square feet. I planted 10-12 different vegetables and herbs. In a later post, I will share my detailed inventory costs.

  1. Agribon Row Cover (for protecting seeds and young plants from critters and birds. Is excellent in offering protection from harsh weather elements. I have spread it out on cabbage plant and it is doing a good job of protecting the cabbage from butterflies and other flying insects. Totally worth the money)
  2. Spray Nozzle
  3. Hose Pipe
  4. Small flower pots (brought them to plant basil and give away seedlings to friends and family. I liked their color and size.Not much use as a necessary garden supply)
  5. Growing Trays
  6. Plastic cells for starting seeds
  7. Single pot (for planting ginger)
  8. Hoop house materials
  9. Seeds
  10. Garden Labels
  11. Fish Emulsion
  12. Potting Mix
  13. Pitch Fork
  14. Spade
  15. 20 Fence Posts
  16. Deer Fence (300 ft)
  17. Woodsaw
  18. Hammer
  19. Trash Bin for food scraps
  20. Wheelbarrow
  21. 10 yards leaf compost
  22. Agricultural Lime 
  23. Rototiller (rental for one week)
All of the above materials were purchased for gardening. Did you purchase similar materials for your vegetable garden ? Where do you think costs could be cut down ? Feel free to add materials you used in your small farm or vegetable garden that you feel were worth the investment.


Best
Krati


Tuesday, April 12, 2016

Preparing land for an edible garden

It's April, officially spring and here is a check on weather. The weather today is similar to what it was in the months of January and March. I don't feel spring yet.

The not-so-spring-weather did not deter me from taking first steps to converting a grass lawn into something useful. Grass is useful but needs to be removed to prepare land for growing food. In doing so, there were a few missteps that happened and their remedial actions I took. Continue reading to know both sides.

The area of my house that I chose to use as a vegetable garden was covered with grass. It was not used for active agriculture in many years. The good thing about that was there were no residual fertilizers that affected the soil. The downside was the soil was too hard to work and acidic and needed amendments to make it suitable for growing vegetables. Most soils in New Jersey are slightly acidic which makes them ideal for growing peaches, blueberries and other fruits.

In an attempt to cut costs and get the work done in less time and effort, I asked a farmer (who works for my landlord) to till the half acre plot of land that I was planning to use by his tractor. The sod on the land was hard to remove and so I thought a first pass by tractor would make the land clean and clear (or so I thought). The farmer agreed to do the work for me. I was happy with my resourcefulness as I got the work done for free. However, the land, with grass on it, after being tilled, looked like this.

Sod clumps all over


Results of bad decision 

A total disaster ! Tilling land without first removing the grass made trench like rows with the tractor's tines. The heavy sod that was dug remained as is and the whole thing, which was done in 25 minutes, later required many hours of work. It looked bad and felt bad. Isn't it common sense to get the grass removed first before tilling. Well yes but in my head I had a picture of the land being plowed nicely so that the grass would churn in the soil and after tilling, the land would become a sod free area ready to be seeded.  I felt a little angry at the farmer too who tilled the land. Couldn't he just advice not to till the land without getting the grass removed. On top of that, when the man stepped down from his tractor, he looked at me and said, well now you have to do the work to prep the area. I wish he just quietly left the scene without uttering a word after creating the mess. 

Common sense comes in small packets and it has to come at the right time to make sense. Apparently, a lot of common and uncommon shining itself after making a mistake. And so mistakes are good. For next few days, I waited for the weather to get better so that I could work the above area and make it more suitable. The weather didn't get better and seeing the mess from my living room window everyday was shattering my spirits. I researched a little on how I could use a hand tiller to till the land and make it more even. It may work. 

A couple of days later I went to Home Depot and rented a rear-tine self-propelled rototiller. 
Honda Rear Tine rototiller

Renting wasn't inexpensive but it was the only shot to fix the land. To explore other options, I thought about calling another farmer who was ready to fix the land. The cost of renting a tiller for a week or calling someone to do the work for me were almost same. Having someone else do the work would have made things so much easier and faster. However, after what happened to my land by the unwise decision to have someone else do the work, I wasn't sure if giving the land in another hand one more time was wise. I wanted to learn the basics of tilling land and doing it myself would help me understand the rototiller and the effort involved in using it. 

I rented the above rototiller for a day but ended up keeping it for a week. The first few hours of using the machine were spent in figuring how to bring the tines of the tiller into action. A whole day of rental cost spent and the tiller wasn't yet put to action. So, like I always do, sat on my computer and searched the keywords "why does my Honda rear tine rototiller not work". Turned out it was a minor thing that I was missing. The big boy was in the game. 

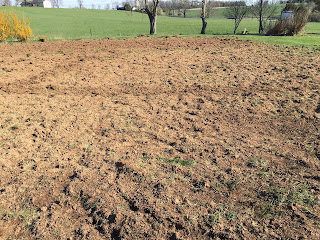
Using a tiller like above isn't all that hard. However, maneuvering it through an uneven piece of land with heavy sod is a work. Since the tiller was only about 2 feet wide and I was using it to till 10,000 sq ft of space, it wasn't difficult to figure out that this would be a time consuming task. I had to lift a few chunks of heavy sod from the path of the rototiller by hand as they would prevent the tiller from moving forward and there was a danger of damaging the tines. The machine turned out to be very handy and useful in making the land even and breaking down big chunks of grass. I left around 12 ft of space from the edges of the plot for accessibility and staying away from any utility lines. Seeing the tiller do it's wonderful work of breaking the sod on second day was so relieving. I tilled one third of the plot each day. The work should have been done in three days but cold spell of weather along with rain made working outside unsuitable on few days. At the end of six days and sore hands and shoulders, the land looked like this. 


The plot of land is much more even and workable. It is not entirely free of grass but in a shape where it could be put to work. I did not throw away all the sod that was removed. I put some in my compost bin and put aside some more for using it further in the season. I will write another post on how I plan to use the sod. The grass that still remains on the tilled land isn't all that bad. It's earthworms' food and an active ingredient of biological soil activity. Eventually, the grass will decompose in the soil. It may cause weed issues in hot summer months but I cannot be sure about it at this time.

A better approach to prepare a grass lawn to a vegetable garden would be to first remove the sod entirely by either using a sod-cutter or better yet, calling your nearby landscape designers. Landscapers do a good work of putting grass and also removing it. They do not however till the land (mostly). Once the sod is removed, using a tiller would be much quicker and easy. The rototiller is a handy equipment for garden and farm. It is best suited for small plots of land. I could have rented other machines to make things easier but nothing would have been cost-effective. I do not want to buy heavy equipment for my garden in my first year.

 I gave myself a dinner treat on the evening I completed the work of fixing the uneven, messy land. The entire effort was worth it. My next step is to amend the soil to make it more suitable for growing vegetables. More to come in next post.

Share your feedback in the comments below.

Best
Krati


Friday, April 1, 2016

Indoor growing...a health check

It's been more than three weeks since I planted different vegetable seeds and I am excited to share their progress so far. There have been a couple of failures in the way but for most part, the seedlings are growing well (as you can see in the pictures below). I think that the seeds are growing slower than usual at this time of the year (or maybe my patience is running out).

The little lemon

 Lemon, well, of course, takes years to grow. Still, I am growing lemon just for the love of it. I am growing my lemon in Miracle Grow Nature’s Care Organic potting mix from Walmart.  The potting mix is good though it does not contain anything that will add porosity to the soil. Hence, while using this potting mix for my plants, I had to add Perlite as a growth media to promote adequate water drainage in the soil (I didn't use Perlite in lemon though). 

I read somewhere that Mayer lemon is the most preferred variety to grow indoors. I didn't use Meyer lemon for my experiment since I wanted to take the challenge to grow a store brought variety from seed (not sure of it's name). If it succeeds to grow a bit this summer, I may gift it to a friend who lives in tropical side of the country to take care of it next season. If it doesn't, well, lesson learnt.

I am also growing basil for my garden. Basil is a warm weather Mediterranean, sun loving plant and it's still cold and stormy here in New Jersey every other week (far from a Mediterranean weather).The little seedlings of Genovese basil have sprouted well in this weather and will continue to grow as the weather gets warm.

Basil
The little basil

            
Fenugreek and cilantro turned out to be a disaster last month. Fenugreek died one day without any warning and cilantro grew spindly. However, the second plantings of both is growing well. I was careful in not exposing cilantro to hot sun and keeping the soil moist (not wet). Cilantro was trickier than I expected. One set of seedlings has long stems and few leaves. The other set of Cilantro is short, firm and with a good set of leaves. I can't say for sure why the difference in growth patterns of the two sets.
Cilantro..growing well


Beloved fenugreek

      
 I will learn the rules of the game sooner than later. When you are dealing with living plants, soil, weather and the entire growing ecosystem, you are dealing with a living system. Living and growing systems are hard to manage. I can only provide the right conditions for a plant but I will have to leave the rest to the nature. Lessons in gardening come from trial and error, hits and misses. I will give these seedlings a little boost of plant food in next couple of weeks to replenish the nutrients. More updates on what I use as plant food for seedlings later.


Ground Cress..first set of true leaves beginning to sprout

Cabbage..just a week old


A short disclaimer