Social Media Icons

Wednesday, January 9, 2019

Introducing our e-gift cards

It has been two years since Brown Leaves Farm changed from being a land to being a business. I remember clearly the first day on my farm, two months after me and my husband moved in the house, on a sunny day in March 2017. I stepped out of my house to see what's out there. At that time, I had no clue about things will turn out and how will I bring a 10,000 sq feet section of grass and weeds to a productive space. I inspected the farm and did the easiest thing I could do that day...picking up some fallen tree branches and measuring bed space for two raised beds. That was it for the day. On that day, in my mind, everything else that needed to be done was beyond my skills and labor.

In last two years, I have not only raised vegetables on the same plot but also built a business around growing quality food for local markets and community. The appreciation, support and response about what I grow is the thing that kept the business going. Brown Leaves farm is a two person operation (1.75 person to be precise 😊  )  and we only sell what we grow during the season . As such, we try to keep the farm a lean operation so that we can maximize our tight budget and minimize food waste. We also continually try to improve our operations not just from production stand point but also for our customers that support us through out the season, even when we got 46" of rainfall in one year.

This year, we are introducing our first ever digital gift cards that can be purchased from our website here and used year round to make direct purchase of our produce. We want to make your shopping experience with us more than just cash based purchases. When you buy a gift card from us, you show your support for a small farm, it's value and it's people. This, in turn, helps us get some early season capital for the farm and keeps the wheels rolling. 

The gift cards also enable a cashless transaction during a saleThe gift card is unique to you and by just telling us your gift card number, you can make a purchase from your available balance. The gift cards do not require a weekly or quarterly commitment. You refill them as you like during the course of the year. It’s like supporting our farm but without any huge upfront investment on your part. When you use our gift card, it comes with the benefit of early season produce offerings including things that we grow in limited quantities or do not always bring to farmer’s markets.   Our farm’s gift card comes in denominations of $50, $75, $100, & $150. You choose a type you want and make purchases by ordering online or using it at farmer’s markets. Don’t forget, when you order online, you also have the option of produce delivery at your location. Here is how we see the gift card as beneficial to our customers: 

  • Customers with gift card get preference on produce in small quantities or seasonal availability . 
  • Shop cashless at farm or at farmer's markets
  • Purchase our early produce before farmer’s markets commence 
  • Ease of purchasing without always using cash, at farm or at farmer’s markets 
  • You subscribe, we keep track of your balance.  
  • No monthly or quarterly upfront cost. Use or refill the gift cards when you like. Gift cards are valid till end of the year. 
  • Know that you support a real farm that grows it’s own produce, takes utmost care of its soil and brings you healthy and tasty produce at all times. 
  • BONUS : for first 25 sign ups, to every dollar purchase of our gift card, we add 6% value on top your purchase quantity. A $100 gift card enables $106 worth of produce.

I hope you will like this new service and give it try. If you have questions, send us a message or an email. We can also be reached on facebook and instagram. 

Peace happiness and health 

Wednesday, January 2, 2019

2019 - purpose, plans and emotions

The year 2018 was an exciting and whirl winding year that ended on a good note. I spent Christmas in North Carolina with family and new year again with close family locally. As a little escape, I spent a day in New York City a day before New Years Eve to watch the dazzling lights and crowded streets. A little escape from gloomy suburbs suits me once in a while.

On New Year's eve around 5:00 pm,when I looked outside the window, the heavy rains reminded me of the year that passed. 2018 was a year of record high rainfall in northeast USA. It reminded me of summer days when I stood at farmer's market soaking in rain, when I couldn't go in fields to do work due to mud and rain and when hot humid weather messed up a lot of my crops in my second season of farming. In retrospect, I don't know why I worried so much for unforeseen weather events on which I have no control. Perhaps because crop loss for a farmer means revenue lost. That lost revenue cannot be recuperated the same year. I still did the best I can during the fall months and harvested as much (or as little) as I can after a tough season.

I winded off my season in December. When my fingernails are not filled with dirt and skin not heavily sun-burnt, it indicates I am not working outside anymore. After long tiring days of the growing season from March till November, the month of December was when I really wanted to be indoors and didn't feel like doing much in the field. I still had things to do on farm but couldn't drag myself outside for more than a few days a week.

With time on hand, I spent better part of the month thinking what new offerings can be made to customers in 2019, which new channels can be explored and how can I offer a better, more seamless shopping experience to people. I am also increasing my produce line to include more exciting crops for 2019. One the feedbacks I got from customers in 2018 was to bring more produce variety to the market. A more consistent offering was also something that customers were looking for from us. The feedbacks that we get from customers at markets directs us to adopt methods and systems best suited for our small farm's needs. When I say 'us', the 'us' represents me and my husband. He does most of the heavy lifting and infrastructure projects on the farm.

A good part of winter from December onwards is also spent ordering seeds and supplies for the farm, reading, budgeting and crop planning for next growing season. This year, I met a few very interesting farmers during my downtime in winter. It's exciting to see what other farmers are doing in their region and how their operations impact the local community. This time of the year, while a lot of farmers are already in the fields planting seeds for spring, my wet fields are resting and taking a break. I am carefully examining ways to improve production, improve soil and fix some inefficiencies in operation. I say 'some inefficiencies' because even after knowing what to change, there is only so much I can change in a given year. For one, I am learning to be realistic about my capabilities, strength and weaknesses.

Farming, for me, is a lifestyle where personal and professional parts are intertwined. Everything I do professionally in business impacts me personally and personal events impact the farm business closely. The ebb of flow of personal emotions is tied to what happens at the farm every day, the tasks I accomplish, the positive feedback I get from customers and connections I make with people year round.

I hope all of the readers have a healthy and blissful 2019. 

Tuesday, October 23, 2018

As the growing season winds down

The temperatures are starting to dip. Trees are changing color. The pace slows down. The last crop to be planted in field today is garlic. This year I am experimenting with German White garlic as my first overwintered crop. Crops in the field are growing at a slow pace, which is good because as I harvest the existing crops, the beds will be cleared and put to rest for next year. Cover crop of winter rye is coming along nicely in small plots. The October air gives an indication that the peak growing season is coming to an end.


Say hi


Garlic cloves for planting
Prepped field for garlic sowing

2018 had it's ups and down. Spring was good with bumper harvests and good sales. I joined a new farmer's market in my own town and met a lot of local folks that stopped by at the market. It was also fun to connect with other local businesses and know them up close. In the market that I attended last year and continued this year, seeing customers who remembered me and came back to purchase more, was motivation enough to continue the market. Meeting new and old acquaintances at the market and the summer crowd eager to buy local produce is quite energizing.

From mid to late summer, after rounds of intensive planting and excessive rains, my soil's fertility decreased and crops started showing signs of nutrient deficiency and affects of unfavorable growing conditions. I missed the signs initially and kept planting in hopes of next round of good harvest. The harvests really hit a rock bottom and the unplanned changes affected my overall morale. Things did improve as fall came but weren't at a place that I expected. I felt like throwing the towel because I could not control weather conditions and it's affect in this profession. Then I thought, maybe I should reach the finish line this year and then rethink my plans for next year. There is a saying in farming "If you can observe and respond, you can farm". The saying now rings a bell. Additionally, I felt good that I farmed on a small scale. My expenses were less, and my losses were something I could bear with and recuperate in coming years, And I am glad I didn't purchase any heavy machinery this year in spite of wanting them desperately to improve efficiency of work on the farm. With the weather conditions and other limiting factors on the farm this year, any expensive machinery would have sat in the garage rather than being able to be put to use.

The one thing that I am putting to good use this year in my imperfectly built high tunnel. Even on the cold days and nights at this time of the year, the crops inside the tunnel outperform crops grown in the field. While I do not plan to do deep winter farming in this small high tunnel, I am experimenting how far can I extend the harvest in this structure. The shelter provided by a protected structure like high tunnel accounts for uniform growth of the crop. Out in the field, only the strongest and hardy crops survive. Cabbage, turnips, lettuce, radishes and other greens are still surviving good in the field. They take the warm days, cool nights and rough winds well up to a certain extent.

Spinach in high tunnel

The winter season will be spent planning for next year specifically building a plan to improve soil fertility and preparing ground ahead of next season. Some uncompleted projects from this year will also be finished in winter and early next season (building cold storage and efficient wash station) along with a lot of good reading. I am also adding a few more sales channels to the existing ones in 2019. As a small and beginning business owner, the task of finding the right market for your product is a huge undertaking that requires one to go above and beyond their zone and stretching their existing skill sets. A great deal of learning this year was knowing the sales outlets that are right for me and my scale.

Enjoy the cool season, prepare soups and don't forget to shop from your local markets. The best produce is grown locally and eaten seasonally.

Happy Fall


Thursday, May 31, 2018

May showers - managing farm in rainy months

As the month of May is coming to an end, I am reflecting on the transition from spring to summer as it happened on my farm this month. If we could rename the month of May as month of ZEUS (god of thunder and lighting in Greek mythology), it won't be an exaggeration. Most of this month, it has rained every week , sometimes twice in a week. I have spent a few morning just watching the pouring rain by my living room window when outside farm work came to a halt.


As spring transitions to summer, the month of May is usually rainy.  This entire month I worked on muddy paths and saturated soil that delayed summer plantings. Overall, since I am on clay soil, water drains slowly and it takes days after rains before I could go in the field to plant anything. The early start of the season this year in March enabled me to have 20 seed beds already planted before the onset of heavy rains. They grew slowly due to cold April snow showers but picked up as the season warmed. The challenge in such a month is how to have plants in ground while not disturbing the soil structure. 

The answer is in preparing the beds early on and raising them slightly above the ground level.  Making raised beds manually with a shovel is a time consuming process that slows other aspects of crop production a lot. I do make an attempt to raise some beds especially for low growing crops (like greens) but the task doesn't always fit into the plan. Additionally, it order to make a raised bed, one either has to have externally sourced soil or compost or lift the edges of the existing soil to make the beds raised. When it is wet and soggy, lifting the damp soil by shovel is not feasible. All you life is lumps of water saturated soil. Not only it makes the clay soil hard to work with, the extra effort of disturbing wet soil makes the entire effort not worthwhile.  One has to wait for soil to dry partially, if not completely. Ideally, a well draining soil should dry fast. Since my farm is far from ideal, after rains, the planting areas on the lower end of the slope get water logged and remain wet longer. And, when the rain is really heavy,  some seed beds simply drown. Not all areas of the field are water logged due to the shape of the slope. The planting area higher up on the slope is workable and dries somewhat faster. At times, I have planted seeds by hand is partially dry soil and layered it with a layer of compost. This works just fine in my context for crops like lettuce, cress and other greens. I prepare the seed bed for planting by removing the weeds with a hoe and leveling with a rake before sowing seeds. Seeders don't work very well on wet soil. If it rains heavily again after seeding, there is a risk of seeds not rotting in water. I had recently lost half a bed of spring radishes because the bed was oddly shaped, not raised and the seeds drowned in water. 💔
                                    

I have so far not taken a hard and fast approach to growing in permanent raised beds. It takes a lot of manual work to raise a bed with native soil. Even hauling compost or other externally sourced soil in each seed bed takes considerable time. For my pre-existing beds (that I made last year), I do not always raise them and it still makes an easy planting effort. For new beds that are on a lower slope on the farm, I raise a few beds at a time. I use a shovel to move soil from both sides of the bed and thereby raising it a few inches. I also haul 4-5 wheelbarrow full of compost in each of the raised beds. No wonder bed preparation happens to be a very labor intensive task on my farm and takes a lot of time. With this manual approach, I am able to do only 2-3 beds in a day (besides other field work). In the long run, the addition of compost and soil amendments helps immensely in the health of the soil. On beds that are not raised and are severely compressed, I do one pass with my two-wheeled walk behind tiller to loosen the soil, put compost and level it with a rake. Hauling compost from one place on to the beds is done on raised as well as simple ground level beds.  I do not put lumber around my raised beds as it is an extra effort which I see no benefit to the plant growing in it. And lumbar is expensive to source for me.  Having nicely defined beds held together with wooden supports does make the field look clean and the higher level prevents water logging issues. 

I take a few different approaches to deal with the drainage issues on my soil. At times, I cover planting areas under black tarps. Not only does it suppress weeds and grass, it also prevents water seeping to the ground. Tarp is not a magic bullet in that the area underneath it will the totally dry when you take them off. Secondly, I make the seed beds bit higher than ground level with added compost on top. That gives 2"-3" of height and saves the beds from totally drowning during a heavy downpour. Compost also ensures more organic matter in soil which helps soil attain an optimum level of tilth. Thirdly, I mulch the pathways with straw or wood chips. The most important advantage of this is that the soil near the bed remains walkable and doesn't sink when walked upon. Moreover, the mulch adds organic matter to the soil over time. I do not put wood chips or straw on my seed beds as I need clean seed beds for planting. The mulch takes a long time to break but it does a beautiful job of preventing bare ground. Lastly, I make sure I do not walk on the seed beds or compress them more after they are built. In that regard, once my beds are made, I do not use my tiller to turn over the soil when preparing a bed for next planting. The approaches are incorporated on only parts of the farm at any given time. 

A few approaches of building soil that I do not take right now but are beneficial for the farm health are: 

  • incorporating low growing living mulch between beds to prevent soil erosion
  • building drainage tiles in water logged areas to direct water away from the field
  • putting a thick layer of mulch on all beds at all times
  • keeping unused ground covered with green manure before planting


So why hadn't I take the above steps on my farm ? It's because they do not fit into the production plan currently. Since I do not have external help, I have to choose the tasks that are most needed at a given time to have the farm up and running. The critical infrastructure tasks always take a priority and my husband's time gets consumed in them. I also do not have proper equipment and needed machinery to do many of the tasks that can benefit in the long term. So I chose where to put my effort judiciously. In the future, I do plan to implement above mentioned approaches of building soil comprehensively on the farm. 

Is there anything good about the rains ? Plenty, if your crops and field don't drown. Without me watering the plants at all, the rains spurred the growth of the plants and germinated the seeds in the ground. There is no water plants love more than rain water. The rain water is free from salts and harsh chemicals, is soft and is of the right pH for the plants. Plants grow better in rain water. For this reason, rain water catchment is practiced by many farms where water shortage is imminent.


Rain touched crops

Since nature does not tolerate bare ground, with all the rains, weeds germinated as fast as the crops and my lush green farm is part crop and part weeds. The slugs also came looking for greens as soon as they can find their favorite food. Rain and slugs go together. The slimy little creature eats lettuce leaves in early morning and night. Since there are trees and vegetation around the farm and the soil remains wet for a long time in May,it creates an ideal conditions for them to thrive.  
Slug
The rain is one weather event that affects farmers across the world, most often in a season. One part of the world may complain about heavy rains while another may be waiting for a drop of rain to hit the ground. The availability of produce to consumers, prices of the agriculture commodity and profits made on the farm during growing season are profoundly affected by rains. The ancient cultures worshiped the god of rains realizing how this important event affects the well-being of their community. 

Happy Gardening..rain or shine

Thursday, April 12, 2018

Building and growing in an unheated greenhouse

Greenhouses have been used in agriculture since centuries. It's fascinating what difference passive solar heat can make in growing environment of plants. In the past, plants brought from tropical countries to colder regions of Europe were protected using glass walled structures that provided the needed warmth for them to thrive. From Europe to Asia, farmers have long been using protected structures like greenhouses, tunnels, walapinis and cold frames to provide the conditions necessary for native and non-native plants to thrive. Greenhouses have made it possible to breed and grow tropical crops in regions with harsh winters. Today, these greenhouses have enabled modern farmers, big and small, to extend their growing season so they continue generating income even in deep winters. Greenhouses are truly an ingenious invention and the advancements in their design and technology have contributed to the availability of wide variety of produce that we consume today.

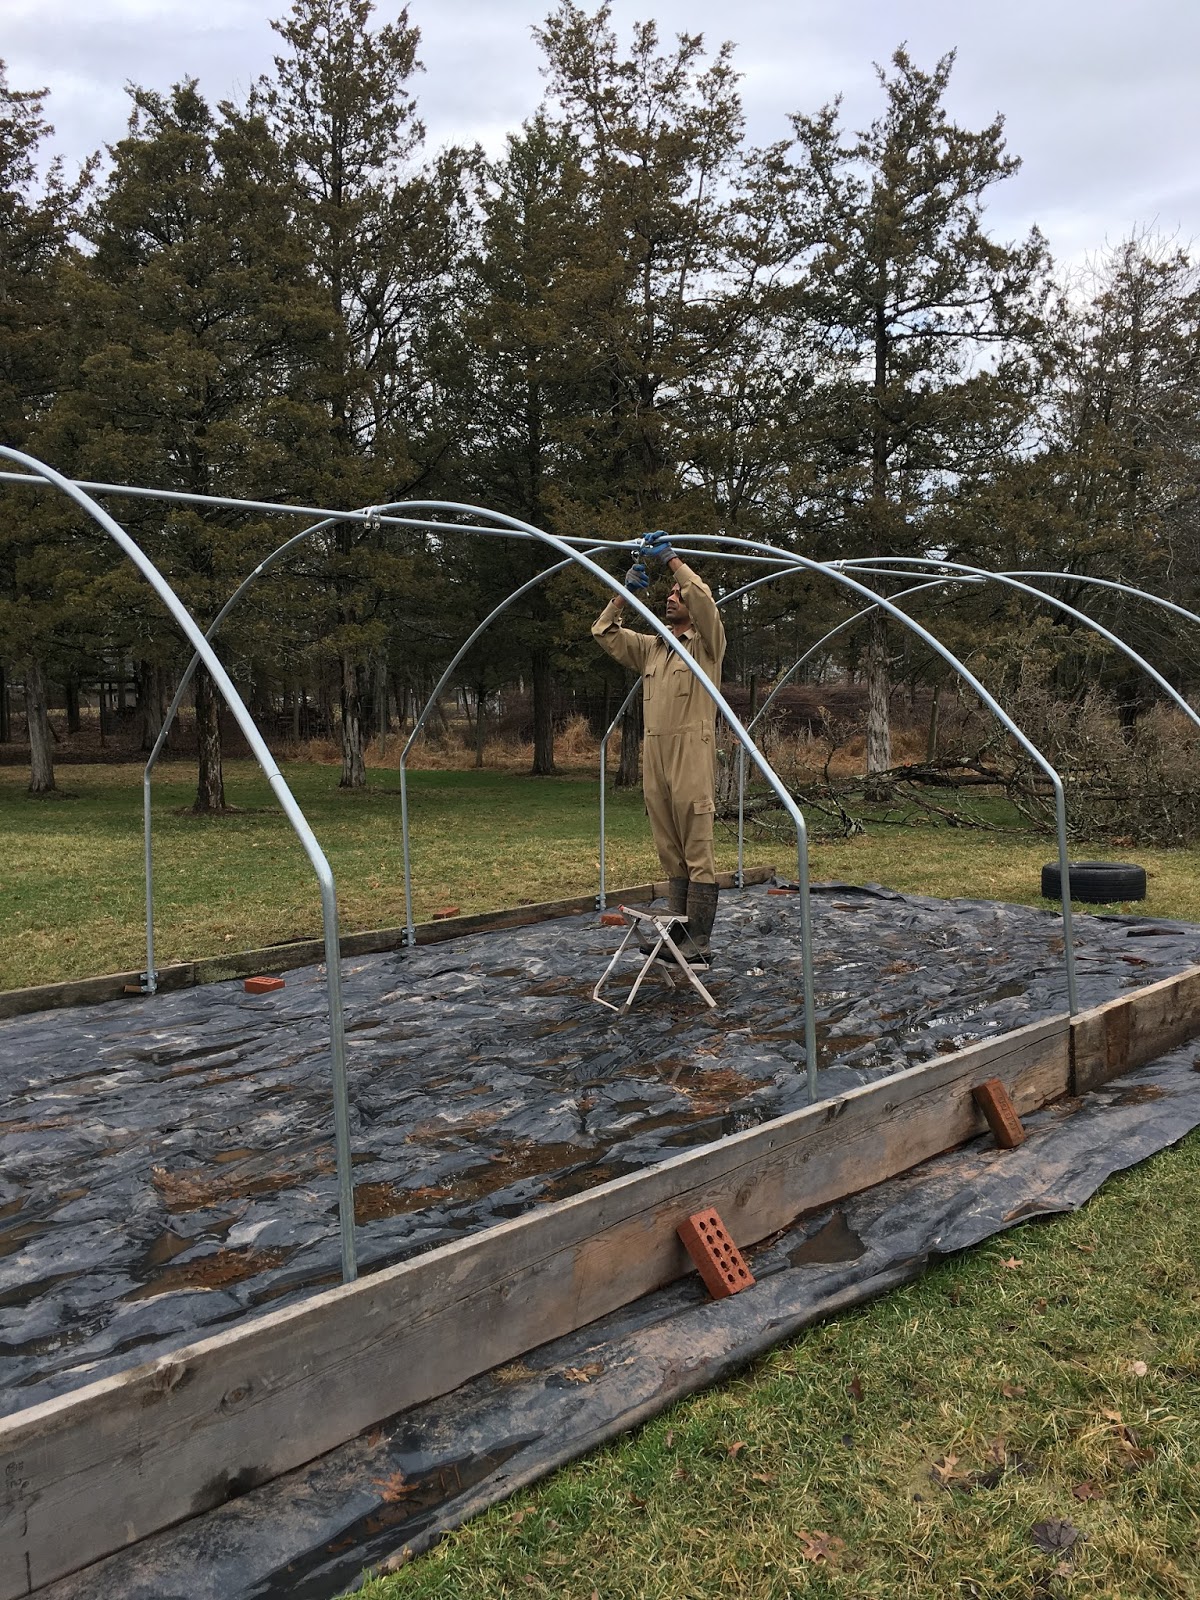
A greenhouse, in broad sense, is any protected structure that provides growing conditions necessary for a plant when weather outside is less favorable. With that in mind, I built a small 12'x  50' unheated protected structure, lets call it a poly tunnel, in March this year on a site that received more than 7 hours of direct sunlight. The purpose of having in my production system were two fold: one, to give space to spring transplants growing in seed trays and second, to give an early start to a few crops. The surface of the poly tunnel was bare earth since crops would be direct seeded or transplanted in rows. And since the poly tunnel survived two snow storms, I am confident I can put it to good use for this year (at least). I am sharing a few design details and it's performance so far.

I purchased this greenhouse from a company named Growers Supply  The size of greenhouse I purchased falls under Growers Span economy cold frame models. This is their low cost, basic model of a greenhouse with EMT hoops, UV treated polyethylene, purlin and screws. The advantage of purchasing a kit versus making your own was it came with all the needed parts which just have to be assembled in place. The disadvantage of such a kit was it still needed extra purchases and multiple trips to hardware store to complete the structure.  The kit did not come with end walls, baseboard and any other additional support to provide strength to the structure.

                                       
poly covering, frame, tunnel, structure


Assembly and Construction

Besides being mechanically inept, heavy parts and tool make me turn my back against them. I avoid unboxing anything marked heavy as long as I am not pushed to do so.  After reading the manual of the greenhouse twice from front to back, I pushed it aside as I knew I wouldn't follow all the stated instructions (I usually don't). Thereafter, I proceeded to do what seemed to be the only option..calling my husband to hand over the task. I would contribute mostly by holding tools, provided an extra hand and helping to keep things back in place when done.

The poly tunnel is 50 feet long, 12 feet wide and 7 feet high. There were 11 ground posts spaced 5 feet apart along the length of the structure. 11 other ground posts were inserted  in ground on the other side by hands. It is imperative that the posts are in straight line. The flat sharp edge of the posts helped in easy insertion in the ground without using any special tool. This task was done on a wet ground with clay soil. Every time a post was dug, water came out of the post. This wasn't an issue but a bit of a nuisance when the posts were taken out and reinserted to the right spacing. We ran a string along the length of the tunnel to make sure all the posts were in straight line. Some geometry can also be applied to ensure the proper spacing and 90 degree angles between the posts.


The next task was attaching the metal hoops together separate from the frame of poly tunnel. The arched hoops of the frame were not in one piece. I wish it was as the frame would then be one big bent conduit. A set of 2 arched metal hoops was screwed together with the rafter to form the frame. The frame was attached to the ground post. A few inches of discrepancy in width of frame and placement of ground posts amounted to errors in the measurements that took some time to correct.

The next task we did was to attach a wooden baseboard along the base of the tunnel on both sides. I used scrapped lumber as baseboards (buying new lumber would have been expensive). Since the end posts were not in a straight line at first, I had to remove them from ground and adjust their position. If the end posts are slight misaligned, the straight baseboard won't attach snugly with the posts when screwed. A piece of 1 foot wide strip of black plastic underneath the baseboard helped with weed control along the edges of the tunnel. The baseboard was attached to the end post using metal clamps and tek screws.


Thereafter, the top purlin (that came in 10 foot long sections)  was attached to the frame. We realized, after much effort, that attaching the purlin in small sections at a time was much better than lifting the entire 50 feet long purlin up to the height of the tunnel and then attaching it using cross connectors. I wish the tunnel came with pre-drilled holes since making holes on round surface of the metal pipe using a hand held drill was quite inconvenient. Each separate section of the assembly where metal pipes attached to each other required drilling holes in them to screw.
                             

Next step in the construction was to build a wooden end wall on both sides of the frame. We used 2"x 4" lumber for end supports. The wooden end wall also provided additional support to the structure. The wooden frame held a used storm door which could be open and closed as needed.


The last step was putting the polythene over the frame for cover. This step required additional help to hold the polythene together on such a large frame. The polythene was attached to the frame using aluminium U channel and wiggle wire. We were not very successful in stretching the poly cover taught and attaching it without sagging. No matter how much we stretched, we could not pull the poly cover as tightly as we hoped to. For now, I will go with what it is. At a later time, I plan to improve it.


There are a few other design details that I have no covered in entirety. Each cold frame or greenhouse comes with its own set of installation instructions. The design of these structures could always be customized according to the needs of the grower. For example, incorporating roll-up sides along the length of the tunnel provides for an easy ventilation during hot summer days. The frame could also be strengthened using additional wooden frames and support. I used black landscape fabric along the walkway in the tunnel for weed suppression. Other type of mulches could also be used.

The conditions inside the tunnel

When I walk in the tunnel on a cool sunny day, it feels like tropics. The clear 6 mil plastic polythene absorbs solar heat and keeps the poly tunnel considerably warm on bright sunny days. The warming effect of such a structure is a double edged sword. Temperatures can quickly soar unfavorably high inside a tunnel, so much so that even heat moving crops may suffer damage due to excessive temperatures. Hence, ventilation systems are a must for greenhouse of any size. A downside of the poly tunnel I have is it did not come with controlled ventilation. I have a simple window and a door for ventilation on either end of the tunnel. I open the window and door during the day and close at night.  Having roll-up sides along the length of the tunnel is a low key ventilation system that could be incorporated in the design. A more sophisticated ventilation would comprise of temperature controlled vents and gables that automate opening and closing when temperatures inside reach a certain high. I did not incorporate such design in my high tunnel because of additional costs and also because I am learning to grow crops inside a protected environment with basic observation and minimal management.

What you grow inside such a tunnel matters. And the time of the year. At this time of the year, I have spinach and arugula direct seeded in the tunnel. Both cold tolerant plants (spinach is quite hardy) were seeded in March. In the walking pathway (approximately 3.5 feet wide), I have tables for lettuce and nasturtiums transplants, two plants with very different temperature requirements. Lettuce takes the cold while nasturtium, a frost sensitive flowering plant, does not. The temperature differential inside such a simple structure is quite variable from day to night. In early April, the temperature inside the poly tunnel dips down to 20s and 30s, a few degrees more than outside temperature. The only protection the poly tunnels offers at night is from winds and snow. Protection from wind chills and snow greatly help crops thrive in colder conditions.

 On most cold nights, I covered transplants with double layer of woven white fabric covers.  This helped keep the temperatures inside the poly tunnel above 34 degrees fahrenheit when outside temperature dipped to 20s. For transplants, double covers offer added layer of protection.  I also cover the seed beds with woven white fabric to help retain moisture before seeds germinate.

While day time temperature remains above optimum in a poly tunnel, night time temperature remains close to outside temperature. Without layers of insulation, the passive heat absorbed during the day does not retain in night. I have four big drums of water placed on four corners of the tunnel. These drums were supposed to act as heat retention sources that absorb heat during day and dissipate at night. However, they were not enough to maintain above freezing temperatures at night. There are ways to add added insulation for night but without supplemental heating the night time temperatures wouldn't be warm enough to grow frost sensitive crops and transplants. Cool season crops like greens and root crops would do well in early spring in unheated tunnel. The germination is slightly delayed because the soil remain cold but picks up as season warms.


During the summer, I plan to use this poly tunnel to grow tomatoes and basil. More about that in a later post. Managing even a small tunnel like the one mentioned here comes with it's own set of challenges. Watering, ventilating, covering plants and weeding are the things that need attention on a regular basis in a poly tunnel. I currently hand water with a hose the two seed beds and transplants currently in the poly tunnel. It is bit of a task to move the hose pipe carefully to avoid damaging seedlings. It is also very inefficient. For now, it will do. In summer, drip irrigation will be put in place for tomatoes and basil.

A protected structure of any kind is a useful investment for a farmer. The benefits of season extension are directly related to a farmer's production potential for extended season when conditions in norther region of the country make it hard to grow crops in ground. For me, this new high tunnel is a new growing space with different micro-climate and requirements. Let the season begin.

Cheers


Friday, February 23, 2018

Building infrastructure for 2018

2018 started with a nice long vacation with family. Escaping the cold weather for a few weeks in a warm place feels like a blessing. Getting in the mode of work and actually working took me good three weeks. After ordering my seeds, I started planning the big tasks. Since I am adding infrastructure improvements to the farm that are more permanent, planning and budgeting for them in the order of priority was important . Meanwhile, the monsoon like spring season is stalling a lot of outdoor work.

Building a basic, unheated high tunnel for spring transplants is a key project for me this year. While I don't do deep winter farming, having a small space dedicated to seed starts in cool spring months would give me the required leverage for early season production. It is a long term cost effective infrastructure for the farm and now is the time to put it up. I sourced the high tunnel from Farmtek, a company that also supplies greenhouse structures for commercial growers. It is a 12 foot by 50 foot high tunnel that has to be assembled on the desired location. This desired location on  my farm is muddy right now with constant rains but when it dries, it receives the most amount of sunlight in all seasons and is adjacent to water supply. Assembling this structure is actually less than a week's task (2-3 days) but here for us, everything takes longer than usual. The endless trips to hardware stores to find the small things and not having the right tools in addition to needing two person to do the job amounts to the additional time it takes to build a structure. Moreover, carpentry and dealing with materials is a skill I am just starting to understand. Don't laugh when I say I didn't know what a self tapping screw was (and that it doesn't always self taps itself in some places). I will write the review of the high tunnel and it's assembly details in an additional post.

This year, I am expanding the growing space by adding 8000 square feet area into production for longer season crops. Preparing this additional area is another project at hand. While some of the land preparation started last fall, additional preparation including building beds will happen this summer. At any given point, I try to keep my production area limited to what can be managed by 1-2 person at a time. Keeping small also helps me focus on growing crops well while keeping other production aspects in balance.

Experimenting with using wood chips on the farm is another soil building measure I am excited about. I have read and heard a lot of benefits to wood chips for soil if managed properly. Two trees were cut on the property last year and I asked the tree services to dump the fresh wood chips right here. The quantity isn't a lot. The plan is to spread the wood chips on the outer periphery of the new growing area as an edging without mixing it in the soil or bringing them close to the crops. Once they decompose in an year or so, I will see the results and decide if wood chips are any good for my soil in the long run. With using wood chips, or any other external input, one has to be careful with where it is sourced from and what it is composed of.

Installing a new deer fencing is the third important project for this season. Deer are abundant around here and without a fencing in the new 8000 square foot growing area, the crops will be devoured and trampled long before they can grow. Solar powered electric fencing is my first option for fencing. It is inexpensive and fast to put in place. The fencing is well inside my farm and hence, should not be a concern in the neighborhood. More on it later.

Extending the water supply to the new growing area is an improvement I haven't been able to think about clearly. There is no well close to the new growing area. Extending the well water supply there either by putting a PVC line or digging a new well might prove expensive and a task in itself. It rains quite a bit here but some years can be different than others. Having an irrigation source close to growing area then becomes a necessity. I have not yet figured out how I will tackle irrigation to the new area. In the existing growing area, which is water logged currently, I have simply connected hose pipes from supply line. From the main hose pipe, I connected secondary pipes to extend to the desired areas. This takes care of 10,000 square feet of area. The major improvement needed in existing growing area is laying proper drip irrigation to save time on hand watering heat sensitive greens. Hand watering the entire growing area takes a lot of time in summer and should not be used much on commercial scale production for the same reason.

The fourth important project this year is making a small dedicated washing station for vegetables. Till last year, after vegetables were harvested, they were washed in a water tub filled with cold water. The way it was setup was neither ergonomic nor efficient. Lot of bending, moving and shuffling harvest crates, water not draining properly and other limitations made me change the setup. The new wash area, once built, will take care of a lot of kinks. It will be efficient and things will be quick to move in the new setup. The washing station will be utilized mostly for clearing dirt from root crops and hydro-cooling greens. Nothing more elaborate.

Lastly, the current indoor germination room for transplants is also expanding to accommodate more plant starts. That means more shelves, more lights and heat mats for the solanaceuos plants. The indoor grow area is in the basement of the house, simple setup to get a head start in spring before moving them to high tunnel. Later in the season, I plan to do more direct seeding than transplanting. Direct seeding crops fits more in the equation at this time as it is logistically easy to start seeds directly in the ground and the practice is a better fit for my farm operation.

Spring isn't far. Let's get growing. 

Thursday, October 12, 2017

Crops I grew - 2017

It's October and fall is spreading it's colorful hues all around the farm. The hot and humid summer is over and so are the weekly rains. The frost date is still miles away so, up until last week, I was happily planting some cool season crops that could be harvested till end of November. October 5 was the last planting date for the season. Onwards from here, tasks like maintenance, monitoring, harvest, season extension etc take place on a weekly basis. In this post, I will talk about the crops I chose to grow this season, market response and success with each of them.

Spinach: Spinach was one of the first leafy green that I started on a raised bed. Being a cool season crop, spinach does well in spring and produces delicious tasting greens that can be harvested even in deep winters. After the first harvest of spinach in June, all subsequent planting were unsuccessful. I love spinach and I cook spinach quite often. I wanted to take this crop to the market throughout the season.That didn't happen. Spinach is finicky about germination in hot weather. As temperatures soared in June and July, the back bending task of direct seeding spinach by hand on a 40' bed, was an effort gone waste. I also didn't know that spinach needs consistent moisture during seed germination. I missed keeping spinach bed consistently moist on some days which resulted in seed sitting dormant. I kept seeding spinach multiple times in summer with limited success. Each time a crop fails to grow, valuable space and time is lost. After three failed attempts of planting spinach during summer, spinach germinated beautifully in September and October. No back breaking work as I got hold of an old Earthway seeder from my neighbor which made direct seeding a breeze. Spinach is not the easiest crop to grow for beginners. In hot summers, it is hard to keep soil temperature just right for spinach seed to break it's outer seed coat and sprout.
Spinach bed

Cilantro: The smell of this herb is oh-so-good! What's not to love about cilantro. I plan to have this easy to grow herb in my garden year after year. Cilantro grows in most clay soils without much fuss and has negligible pest pressure. The seeds can take some time to germinate but once they do, the plant grows vigorously. A little watering once a week in summer was all I did. I dedicated two 30' beds for cilantro and seeded intensively. I planted it Cilantro in partial shade and it grew well in summer and fall before flowering in early October. Once Cilantro flowers, there is little left to harvest. The delicate cilantro flowers not only add beauty to the garden but are also a magnet for pollinating bees.

Cilantro blooms

Scallions: A member of the allium family, scallions are cold hardy, mild tasting and easy to grow. I started scallions in spring as transplants in seed trays. Scallion take a long time to grow (more than two months) and grow slow. Since they do not form bulbs like a regular onion, it's their green tops that garnishes your meals. Scallions can be harvested over a course of time. I was able to harvest scallion for three weeks without worrying about leaving it in the field. However, once summer hits the peak, scallions became susceptible to thrips and caterpillars which causes holes in the leaves. Proper soil and pest protection measures go a long way in saving onions. Scallion weren't best seller for me in market and so I only took limited quantity of the crop. Additionally, since scallions have a short shelf life, leftovers from market wouldn't store well in my home.  Hence, by end of August, I removed all the scallions as they were growing slowly and looked nutrient deficient.

Basil: I enjoyed planting basil in the field at the start of summer. The smell and taste of the sweet basil leaves is very refreshing. I started basil from seeds and transplanted the seedlings in two 40' beds in the farm. They were off to a good start for four weeks before they succumbed to downy mildew. The constant rains and humid and hot environment favored the spread of downy mildew. Unfortunately, I didn't find any organic measures for prevention of this disease. I tried foliar application of baking soda and neem oil which is supposed to act as natural fungicides but once the disease gets in the plant tissues, none of these measures proved effective. After four weeks in the field, I had to remove all basil plants and trash them in plastic bag. Basil being a Mediterranean plant likes hot and dry as opposed to the humid continental climate of northeast. Greenhouses serve best for basil in this region.

Basil

Sweet Peppers: This was one of my favorite summer crops that also gave me a hard time from start to end. Growing sweet peppers and waiting for it to ripen is a waiting game. Peppers need hot and dry season to perform well.The green peppers are the unripe stage of the fruit. The pepper can be eaten when green but would be little more sweet and flavorful when its color changes to orange or red. The change in color in peppers results in formation of sugars inside the fruit which results in sweeter flavors. I chose the 'Odessa Sweet Pepper' variety of pepper due to the good fruiting habit of the plant and short height. The peppers grew fine but took a long time to ripen and change colors. The peppers had thin skin and were good in raw salads. They were equally good cooked. I was able to to harvest peppers for good two months before I became impatient and decided to unearth the plant to make space for other cool season crops. Unless I have a greenhouse, I probably will not grow peppers next season for market.

Peppers ripening
Loads of unripe green peppers


Okra: Okra is quite an unusual crop for northeast. Not many farmers grow it due to less market demand.  For me, it was a personal liking for Okra. Although I planted too few plants, Okra sold well on all market days even with very limited quantity of it that I took.  I didn't know if it would sell well and so didn't want to dedicate space on my small farm for this long season crop. Most folks loved okra but for some, it was the most disliked vegetable. Okra is more popular in the south than in the cold northeast. At the farmer's market, people were pleasantly surprised to find okra being sold. I was the only one selling it. Okra plant grows well with minimum maintenance. Mature okra plants do not succumb to the usual pests, the June Beetles, that bother them the most. Except watering the seedlings, I didn't do much for the plant in the field. The plant is a shrub with thick stems and beautiful flowers and keeps producing well until cold night temperatures slows down the growth.  In early September, anticipating the temperatures will continue dropping, I removed okra plants to make way for root vegetables.

Okra flower
Okra plants


Root Vegetables: Root vegetables are of the favorite vegetables to eat and grow in fall season (besides pumpkins and squash). Turnips and radishes were the two root vegetables that I grew this year in fall. Some root vegetables are daylight sensitive and hence differ in variety according to season. I started turnips followed by radish in late August and September. Both were salad variety that can be eaten raw. Turnips were first planted in the beds that grew other leafy green. The soil was loose, neutral and amended with phosphorous and lime before direct seeding turnips. The turnips grew well just until last ten days before their harvest. The aphids got on the leaves and it stunted the growth of some plants. I harvested most out of the bed before the pests could destroy much of the crop. By that point, the crop was mature and was able to outgrow the pest pressure. Aphids and slugs were major pests of turnips and radishes this year. The underground pests like root maggot and slugs often chew the edible roots and weaken the plant if left unsupervised. The root maggots, which often destroy root crops by feeding on them from under the soil, were less of a problem for me. Thanks to the row cover that protected both radish and turnips from pests for most part of their growth. Regular scouting of fields is a must for a farmer. It is said that if the soil is balanced and the crop's nutrient needs are met, the crops are less succumbed to pests. In an alternate theory, pests do not eat healthy plants.
 
Turnip harvest

Lettuce: Everywhere on my farm, during the entire season, lettuce spread its glory. I have experimented 7-8 different lettuce varieties this season alone. I transplanted some lettuce varieties, and direct seeded some others. I watered some and left some to burn in the middle of summer. Some lettuce varieties were more loved by slugs and woolly caterpillars than others. Whether it is head lettuce, a leaf lettuce or a romaine lettuce, you could find one of every type in some corner of my farm. At the market too, lettuce sold exceptionally well due to its freshness and quality.  For most part, lettuce grew free of pests. I found the leaf varieties and some blended salad lettuces more pest resistant than others. For example, the loose leaf tango lettuce was grew pest free for an entire month whereas the beautiful Rhazes lettuce was a occasionally eaten by caterpillars. The occasional slugs and caterpillars were scouted and removed manually. With the size of my farm (a third of an acre), some manual processes of pest prevention are easier than hard physical control measures of any kind.


Arugula & Mustard: Arugula and mustard were the two spicy greens that were grown for salads mix. Arugula adds a spicy tone to the salad and complements the milder taste of lettuce leaves. Arugula was also a favorite among customers in the market. I grew mustard more for myself and as an experimental green. It is stronger than arugula in taste and spicier. I cook mustard and spinach together for a wholesome curry. I also add small amounts of mustard leaves to my salad if eating them raw. Market response of mustard was mixed as some folks liked the green and some found it too intense. When using an intense tasting green like mustard, the art is to mix with with milder greens or cook it to lessen the intensity. For the burst of flavor that it offers, a little effort is totally worth it.

Mustard
Arugula


Tatsoi: An uncommon asian green that grows well in cool months of the season. Tatsoi, also called asian spinach, forms beautiful rossets upon maturity (before going to flower). I grew it in limited quantity as an auxiliary green for salads and got a good market response. Few people knew that Tatsoi makes a good stir-fry too. Tatsoi is quite easy to grow and germinates well. Tatsoi, like other greens, grows well when protected from pests and grown in cool weather. Tatsoi is cold hardy and takes on light frost.

Amaranth: An experimental green that I grew for the first time this year. Amaranth grows in wild areas in many parts of the world with warm, dry weather. Amaranth is also popular in Greek kitchens as it grown in many parts of the country. Here is northeast, Amaranth grows in summer till the first frost. Amaranth leaves and seeds are both edible. It is very popular as micro-green in salads. I wanted to grow amaranth as a micro-green indoors but after failed attempt at that, I threw the seeds in the field and let it grow. Amaranth grows fast with very little care as long as it keep getting sun. The dark red leaves were truly a sight on the farm. As the plant gets big, the taste of leaves becomes strong. That's when this nutrient rich green is great in cooking as a stir-fry. In market, very few people tried Amaranth in the first few weeks. Later, as more food enthusiasts used it in their kitchens, it became popular. With unique and exotic crops like Amaranth, getting people to adopt it is a challenge. As a grower, I see it as an opportunity to offer something that differentiates me from other growers and getting creative in ways to market the same. If there is however, no market for a crop, there is no point growing and investing in it. I will grow Amaranth once again in limited quantity next year.
Amaranth leaves


Most of the crops I grew this season had short DTM (days to maturity). The ones with longer days to maturity like scallions, okra and sweet peppers were grown to have a continuous harvest in hot months when greens are difficult to grow. Yields from summer crops was lower than expected due to a variety of factors.

Being my first season in commercial production, I fared well. On a farm, I am constantly learning about the plant, soil and myself. Infrastructure management, crop monitoring, pest control, business management and marketing are equally important part of a farm business that requires attention. The season isn't over yet for another month before the start of vacation. A couple of projects are lined up for winter. More on them in later posts.

Happy Gardening

A short disclaimer